Git Beginners
Welcome to GitLab!
If this is your first time using Git or simply using this GitLab server, please read through First time using GitLab before anything else.
If you are looking for GitLab's docs, they are here.
Git quick reference
This is a quick reminder of the basic commands.
Cheat Sheet
A more complete "cheat-sheet" can be found here.
The above is a very good summary, and you are encouraged to have it open or printed out for your reference. Here is another good guide.
Simple Git Flow
git pullto bring changes from GitLab to the local repository.- Make changes to your local files in the repository.
git addfiles to the index (staging area).git committo move changes from the index to a local commit.git pushto send local changes to GitLab.
Git Setup
In the sections below, --global implies changes will be applied to all projects. Remove the --global to apply the settings to only the current project.
Simple Git Commands
| Command | Effect |
|---|---|
git pull | Fetch the latest commits from the GitLab server and update your local repository. |
git status | Show the current status of the local working tree. |
git diff <file or directory> | Show changes from the file or all files if none specified. |
git add <file or directory> | Add the specific file or directory to the staging area. |
git commit | Move the changes from the staging area to HEAD on your local machine |
git push | Send the commits on your local machine to the GitLab server |
git reset <file or directory> | Un-stage changes to a file that have been git added. Local changes are kept. |
git checkout -- <file or directory> | Replace the changes in the file with the last content in HEAD. Local changes are removed! |
git reset --hard origin/master | Replace all local changes with the server version. Local changes are destroyed! |
First time using GitLab
This section is aimed towards first time users of both Git and this instance of GitLab.
What is Git and GitLab?
Let's get this info from git's website:
Then from the Wikipedia page about GitLab:
For you, as a student, this means you will:
- Have at least have one backup of your code in a safe place, provided you push your local changes back to the CS GitLab server,
- Have version history of all your changes, provided you've pushed each change to the server,
- Learn how to use version control to help prepare you for the working world,
- Be able to safely submit and track your code, with the over-site of the lecturers and demis.
Important
Always have a number of safe and secure backups of your code. GitLab should house one of a few copies of your projects.
Warning
A secure copy is not a public project on GitHub or any other hosting service. Nor is it your friends computer. Please refer to your module guidelines in regard to code sharing and see the plagiarism declaration for your course. Here is a reference for general student responsibilities:
https://www.sun.ac.za/english/legal/student-discipline
Otherwise, when in doubt, ask your lecturer.
Login
GitLab has been set up such that you can log in with your Stellenbosch University credentials.
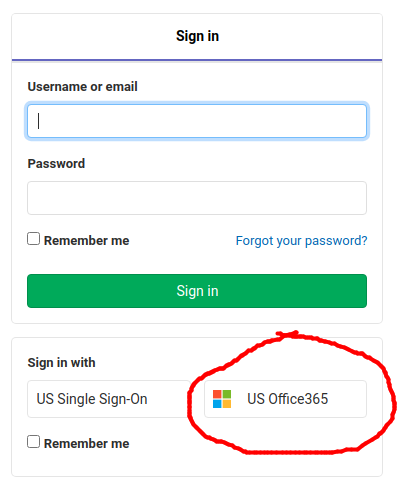
- Navigate to https://git.cs.sun.ac.za/users/sign_in, or click here to open the login page in a new tab.
-
Now click the US Office365 button encircled in red in the below image.
-
You will be re-directed to the Microsoft office OAuth system to log in with your Univerisy credentials.
Congratulations! You should now be logged in. You won't be able to create any projects or groups as an undergraduate, but if you are a postgraduate, you can request permissions for this.
If you have been enrolled in a course that uses GitLab for projects, you should see the projects listed on this page.
SSH key Setup
Next, we will need to add your SSH key so that you can clone a copy of the project repository (or repo for short) to your local PC. We assume you are using a NARGA machine in Ubuntu, but these instructions should be applicable for any Linux machine.
The purpose of the SSH key is for you to authenticate that you are who you say you are to the server. So DO NOT share the key, or your password that you used to lock the key. Keep your password safe, but don't forget it! You should note it down somewhere safe and keep it with you as you will need it to unlock the SSH key in future.
Generate a new SSH key
Courtesy of Willem Bester.
Info
- An SSH key pair has a public key and a private key. It needs both to operate successfully.
- If you already have an SSH key pair, and you did not change the default settings, your private key will be saved to
~/.ssh/ida_rsa, and your public key will be in~/.ssh/ida_rsa.pub. - If you generate a new key pair, and you use the defaults (as described below), the existing key pair will be overwritten, and therefore, be lost.
- If you forgot your passphrase, or if you forget it in the future, it cannot be recovered, and you have to create a new key pair. The new key pair must be registered anew for repository access.
Important
- The following instructions are for generating a default key pair. We are not going to consider how to manage multiple key pairs.
- If you want to want to abort the key generation process at any point, just hit Ctrl-C.
- Log into your lab account, and open a terminal.
-
On the command prompt, type the following, and hit Enter.
ssh-keygen -t rsa -b 4096 -
Just hit Enter to accept the default when the program responds with
Generating public/private rsa key pair Enter file in which to save the key (/home/user/.ssh/id_rsa): If you had an existing key pair, the program will display: /home/user/.ssh/id_rsa already exists. Overwrite (y/n)? Type y and hit Enter to overwrite. -
The program will now prompt you to enter and confirm your passphrase. In each case, enter your passphrase, and hit Enter. Do not leave your passphrase empty!
Enter passphrase (empty for no passphrase):
Enter same passphrase again:
If you entered the same acceptable passphrase correctly twice, the program will display something like:
Your identification has been saved in /home/user/.ssh/id_rsa.
Your public key has been saved in /home/user/.ssh/id_rsa.pub.
The key fingerprint is:
7b:04:31:39:cf:18:5a:b9:74:e3:53:cc:2d:32:72:b1 user@host.com
The key's randomart image is:
+--[ RSA 4096 ]----+
|        oo.+ .    |
|        Oo*.= .   |
|       +.%E= .    |
|      . o.=       |
|        S ..      |
|         o        |
|        . .       |
|         .        |
|                  |
+------------------+
Tip
Run ssh-add to add your new SSH key to your current terminal session. This will avoid future issues. You only need to do this right after you have created a new key.
Add SSH key to GitLab
Now we will copy the key you have just created to your GitLab account.
- Open terminal.
-
Type:
cat ~/.ssh/id_rsa.pub.For example (usually the key appears on more than one line):
cat ~/.ssh/id_rsa.pub ssh-rsa AAAAB3NzaC1yc2EAAAADAQABAAAB/Qw/T0HlOcbh+joCpYjyQQo4X0C0JHDhw08EPxjYs1vC1eiN3Rd6rL7YGhQqhmhduoAwMZszqN8HL/lXVecljbGzh5e6nPt47yrCMO8LRW5tjUc1yF9SVpslqI+ehFX6aFFMByMLCA5Z4LHiukTQ0fdgfhfggfhdgfnQYuzD8e2nywBCWUeGK+nNmqVbgcZoH6xPHeiLV+g+1mBLOmZzNzHLCzteHXRISzb/3AthRq6YVPFCHRLfubekQCCXlYHYCjA890dQ-s+9SUjBpYXB/VvYKYolW1diXSQ7VvkD38BJlOq6L9pKH0NlAxhAEzUSfrWN0gm8OBkIBb/dksIDxQvUUmvEiD4DW693RUevl/1hZsZ/hQmk3TSdK62C7z7eSlroS59eCcaAVRL009crF3H3gAUjMh/XfBY9nw+8HBpBA6BlOSI29owviZFUexVHcUG6SVkGyaH/Z9R6cYJZnDIRC4MmDNDVUnERR+1dAhgXHIqpYDG0h5cWlDvpzosIAkPK5y+/ExsjCPkRlEX5mMgL7Nm5pmtD/avxCeQRVRRsag//FPY50Nns8a4+J5yZb0uM8eTEAug1CDSNrmSl4ofrchCJxvVo9BQ0yA/kS9I2ffnUhftr/TzhlXQVkGx3/7+aSA6vpXgWByrPiW4fDilPq0Gp8XZJP8DIwiPGt1GXp name@example.local -
Now, in your terminal, copy everything from (and including) the
ssh-rsato the end of what would be theexample.localfrom the above. You should have copied the entire output from the command. -
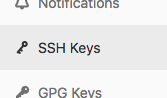
In GitLab, click the top right button by your name (you'll need to be logged in) and choose Preferences then SSH Keys from the left menu. It will look like this:
-
Paste the key you copied into the Key section, and add a name for your key, or leave the default.
- Click "Add Key". This option will only show up if the key is correctly copied over.
You have successfully added your key to the server. You can now get your code from the server, and send your changes back to the server.
First "clone", "change", "commit" and "push"
In this section we will learn how to clone your project down, add changes to it, commit those changes and send them back to the server.
Before we begin
Before we clone down a project for the first time, there are a few things we should set that will allow us to avoid future questions.
First, set up your username and email address globally with the git config commands. This will allow you to identify yourself in a friendly way to the server. You can find the commands here and here respectively.
Next, let's set git to only push your current branch when using the git push command. This is the recommended default behavior. Use this command to achieve this behavior.
First project clone
Let's get your code from the server to your local machine.
- In the browser navigate to Projects (top left) and click Your Projects. Then select the project you would like to clone to your local PC.
-
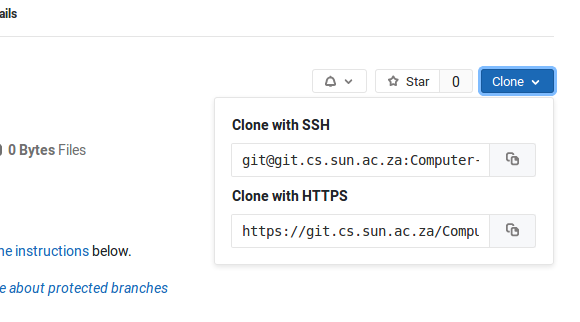
Copy the git URL by clicking the copy button. See the section encircled in red below. Ensure that SSH is selected on the left of the URL box.
-
Open a terminal and use "cd" to change directory to where you would like to store your code. For example, below I create a new directory in my home directory called "git", I then "cd" into that directory.
# "~/" is a shortcut for your home directory $ mkdir ~/git $ cd ~/git -
Let's finally make a local copy of your code! In a terminal type and paste
git clone <copied URL>.Tip
To paste in terminal, use the keys ctrl + shift + v.
Note
Since this is probably the first time you have connected to git.cs.sun.ac.za, you will be asked if you want to trust this host. We are vouching for git.cs.sun.ac.za, so you can safely type
yes. -
For example, this is what happens if all goes well:
$ git clone git@git.cs.sun.ac.za:slug/netbot.git
Cloning into 'netbot'...
remote: Counting objects: 430, done.
remote: Compressing objects: 100% (57/57), done.
remote: Total 430 (delta 52), reused 80 (delta 41)
Receiving objects: 100% (430/430), 68.86 KiB | 530.00 KiB/s, done.
Resolving deltas: 100% (215/215), done.
If you have successfully cloned your code onto your local PC, well done! You should see a new directory within the directory you created with the same name as your project name.
Otherwise, if something went wrong, make a note of the error you encountered and ask a demi for help.
Make a local change
Let's create a file in your git directory and see how this change is shown in git.
- First "cd" into your newly cloned repository. For example following from above:
$ cd ~/git/netbot/ - Now create a new empty file using the "touch" command.
# First we "ls" to list what is in the directory $ ls # We see there is nothing. So let's create a file called "fred.txt" $ touch fred.txt # Now if we "ls" again we see that fred.txt exists $ ls fred.txt - Now let's ask git what has changed in the repository with "git status": We see that there is a file called "fred.txt" that is not yet in the index, or in the repository.
$ git status On branch master Your branch is up to date with 'origin/master'. Untracked files: (use "git add <file>..." to include in what will be committed) fred.txt nothing added to commit but untracked files present (use "git add" to track) - Let's do as suggested and add the file with
git add fred.txt. -
If we type
git statusagain we see:Now we see that there are local changes that have not been committed, but are being tracked.On branch master Your branch is up to date with 'origin/master'. Changes to be committed: (use "git reset HEAD <file>..." to unstage) new file: fred.txtDo step 2 to 4 again with a new file called "java.txt".
Now when we
git statuswe see:On branch master Your branch is up to date with 'origin/master'. Changes to be committed: (use "git reset HEAD <file>..." to unstage) new file: fred new file: java.txt -
Once you have made all the changes you want for a certain piece of work, you can commit them all together after adding them.
We commit these changes with the command
git commit. Once you issue this command, you will be prompted with a text editor of your choice so that you can add a comment to this set of changes.This is as if you are saying "this is a group of changes that belong together and that I am finished with for now".
In this message you will also see a summary of changes. You should see both "fred.txt" and "java.txt".
Once you have saved your message, you should see something like this:
This means your changes have been successfully committed! However, they are not on the server yet.[master 6b46d28] Added Fred and Java to fix bug 33 2 files changed, 0 insertions(+), 0 deletions(-) create mode 100644 fred.txt create mode 100644 java.txt
About Editors
By default you will be using Vim. This is an advanced text editor. Vim has 2 modes, command mode, and text entry mode. Hit i (insert text) on the keyboard and enter your commit message, then press esc to go back into command mode. Now lets write out the changes and quit by typing :wq. See the links for some helpful vim guides.
See here and ask a demi to help you change editors if need be.
Sending code back into GitLab
Now that we have added a commit, we need to send those changes back into GitLab.
- Back in your terminal, "cd" into your project directory.
-
Type
git push origin master.Tip
In future you only need to type
git push. We only use origin master here because this is the first time we are pushing to this empty project. -
You should be prompted for your SSH key password. Enter this and hit "Enter". If all goes well, you should see something like the below.
Counting objects: 3, done.
Delta compression using up to 4 threads.
Compressing objects: 100% (2/2), done.
Writing objects: 100% (3/3), 437 bytes | 437.00 KiB/s, done.
Total 3 (delta 0), reused 1 (delta 0)
To git.cs.sun.ac.za:slug/netbot.git
   715fe21..6b6d123  master -> master
Congratulations! You have added your local changes to the server. Feel free to click around in the browser to see what this looks like.
Best practices for your own (and others) sanity
- Add changes to your commit often.
- Commit and push when-ever you step away from your work.
- Try keep all changes that are in a commit related. Remember you can create many commits by adding only specific files to a commit, then push all the commits to the GitLab server at once.
- Make your commit messages helpful. Short, but descriptive. Remember you can enter a 2nd line of text.
Conclusion
You should now be able to manage and contribute to your project! Good luck, and if you spot anything wrong with the wiki, or have suggestions, please log an issue about it here.
Troubleshooting
SSH Agent refuses to sign and send key
When trying to clone/pull/push, if you find yourself getting this message:
sign_and_send_pubkey: signing failed: agent refused operation
Issue SSH_AUTH_SOCK=0 in your terminal and try again.
If your opperation succeeds, then Gnome Keyring is to blame.
To fix this long term disable the ssh-key agent from the gnome startup settings. The SSH Key Agent setting should be unchecked like below.
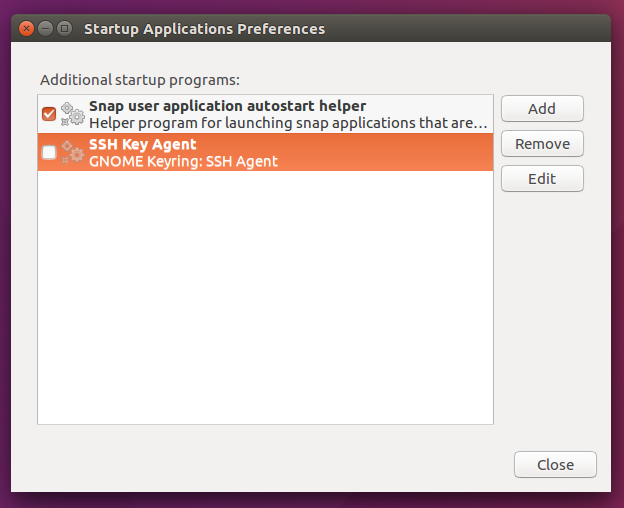
Now logout and log back in to test if things are working.
SSH connection check
If you are struggling to connect to the server, try run ssh git@git.cs.sun.ac.za from the PC you want to connect from. For example, a correctly working key should produce the below output, except with your username or student number.
$ ssh git@git.cs.sun.ac.za
Welcome to GitLab, @ajcollett!
Connection to git.cs.sun.ac.za closed.
ssh-add to load the key into this terminal session or try from a new terminal window. Links
| Link | Description |
|---|---|
| git - the simple guide | A short but decent guide. Helpful if you want to set up on your own PC. |
| RW244 Documentation | Willem Bester's website, includes many helpful links. |
| Vim Quick Guide | A quick start guide for beginners to the Vim text editor. |
| Vim Cheat Sheet | A more exhaustive Vim cheat sheet. |
Created: 2023-08-29